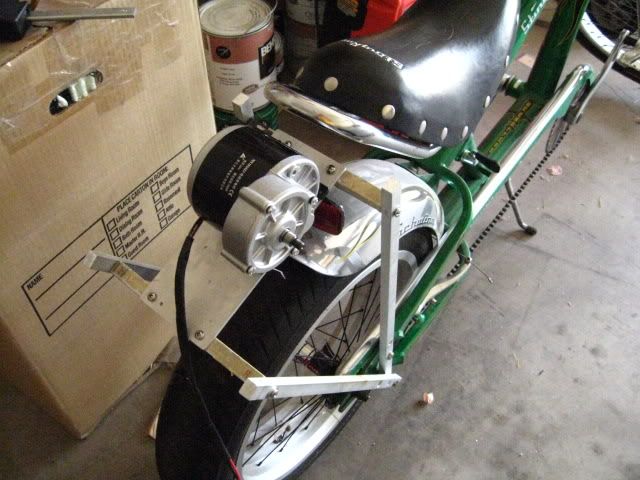
I planned on motorising it... somehow, someday. I began work on that early this year. An M.E. I correspond with told me about some scooter motors that had bike chain sprockets already. So, I tracked one down and bought it.
I had to do some "imagineering" (What to do? What to do?) and decided to fabricate a platform to mount the motor over the back tyre. I snapped a 10-24 tap and busted a drill bit in the process, owing to the hardness the struts' particular grade of aluminum - nothing that a liberal slathering of JB-Weld couldn't overcome.
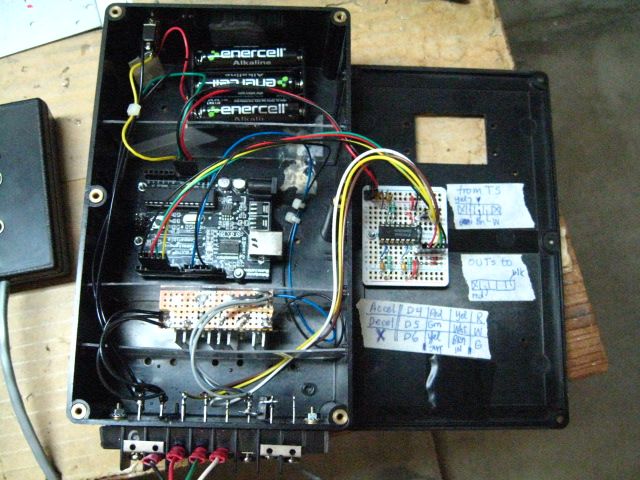
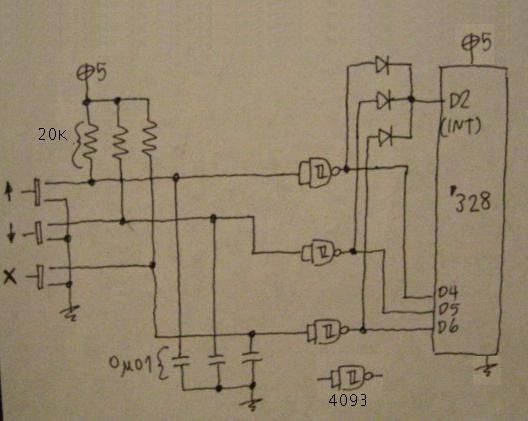
I decided to use an Arduino microcontroller for a motor controller. It decodes some switches on a handheld to ramp up/down PWM levels.
First, I bench-tested the motor, to get a feel for that.
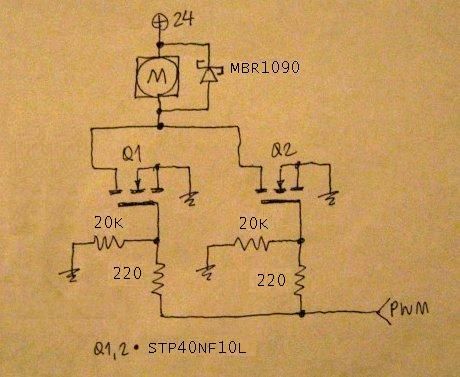
I'm going to use a MIC4427 between the PWM and those Gates. For better V_GS, and its lower r_ds[on], I'll also rig in a 6V AAA-pack, too. Then I'll give that "accelerate from a dead-stop unaided" test another shot.
>>> The STP40NF10L FETs worked out much better: I can take-off unaided and without anything burning up! <<<
I couldn't find any good info on debouncing in software, so I made this debouncing circuit for the handheld. It makes use one of the ATmega/Arduino Hardware Interrupt pins. (There's a 4x4 matrix library around, but I didn't want to dicker with that.)

If I had, or had access to, a finger brake (box and pan brake) then I'd go another way. Northern Tool has one for around $500. The ideal would be to have the batteries stacked in a box located in the area under the crossbar. I went about on the streets for around 4 miles in addition to a bit of leisurely, free-style roaming in an empty parking lot this morning. I should probably fit a voltmeter on there to see how that goes - or do that with the Arduino and an LCD (BATT V = __ RPM = __) Somehow, the chain loosened up again or something, because all that slack came back. I couldn't sneak in any more washers though, even a "non-fender" flat washer was too tight. So, I shimmed up the front end of the deck (the back end hinges). The struts don't look like they're bending, so maybe the chain is stretching. We will see.
Update 2012JUN29 ─ I'm re-working the battery tray idea by abandoning the pan idea. Last Saturday, at BigLots!, I found some plastic baskets. They look like small milk delivery cartons. I've been trying to decide whether to mount them in back, one on each side, or going with just one bungee'd to the fork which would be less work.
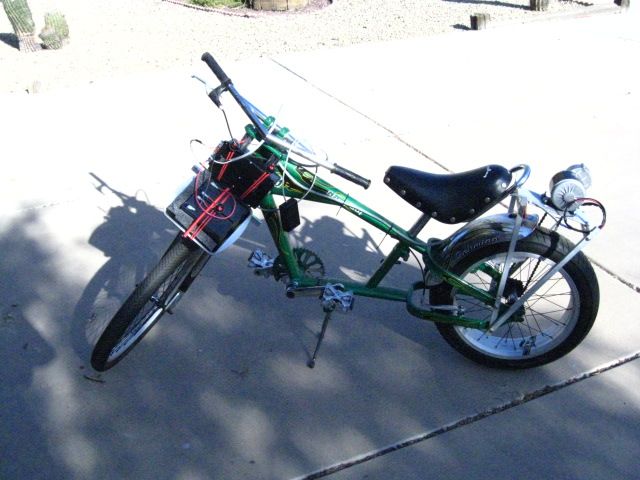
Update 2012JUL06 ─ I tried out the plastic basket. I didn't want it to be tilted, even though SLA's are OK with that (I'm told), so I got a length of pipe cut and situated that between the box and the fork. With that it's nearly parallel to the ground. As you can see in the pictures, I bungeed everything into control. [How many? Seven!]

Not the sturdiest build in the world, but an improvement on the cake pan.

Maybe I should get on with that bigger sprocket - "gear up, mate" - and see if that helps or harms.
Update 23 MAY 2015
I now have a new handlebar, high-rise. Got hold of some angle bracket for battery mounts. I've wanted to have them at the front of the frame, but I may go with having them at the back, either side of the rear tire.
It hit me that I never "posted the code" - check for it over in "Where's the Code?" - echopper_PBs_04
Update 31 MAY 2015
Got an electronic throttle to throw into the mix.
Update 13 MAY 2017
Wow, it's been a couple of years already. These things take time.
I implemented the plan basically as described in my 2012JUN17 Update.
I got a length of t-extrusion and found some brackets (taken from my Big Collection of Stuff to Use Someday) and got busy again.


I did some coasting and it's a lot closer to my knees than I planned. Cutting the extrusion should help in that regard. I should remove the pedal-crank assembly, but I don't know how to do that and youtube demos I've seen show it to be a total pain, too.
I haven't done anything with the electronic throttle. I'm going to stay with the pushbuttons while I get this re-work squared away.
And I have to pull (remove) the brake cable, it can't reach the handlebar anyway. Oh, speaking of which, I did that remove-and-replace:

Maybe the bicycle shop can do me a custom disk brake (and probably want me to remove the motor etc. to do that).
Big progress.
Update 2017MAY22
Got the batteries on the rack, the electronics box bungeed to the fork - and no more basket!.


(I would really like a different saddle and a longer mount for that too, but it's not a standard diameter, perhaps unique.)
Maybe just take a link out of the chain? Cheap tool to do it, available at wal-mart. And plastic box for batteries.
ReplyDeleteThat car was noiser, but not by much!
ReplyDeleteOh, for Pete's sake -- when I go past, the birds' chirping can *still* be heard. How's that for perspective? If you came over you'd be like me, wondering what the issue is. ("Noise? What noise?")
Deletei was playing around with the arduino driving some wheel chair motors, they had quite a loud hum running at the default PWM frequency 488Hz (if i remember correctly).
ReplyDeletehttp://www.arduino.cc/cgi-bin/yabb2/YaBB.pl?num=1235060559/4
was very useful,
TCCR1B = TCCR1B & 0b11111000 | 1; and
TCCR2B = TCCR2B & 0b11111000 | 1; in particular
to set the PWM frequency to 32Khz, which eliminated the hum and i was left with only gearbox noise.
Cool project! Could you post some more info about some of the major parts? Specifically the model number/purchase link for the motor, what kind of battery, etc.
ReplyDeleteI'm doing something similar to a roadbike and that would help me out a lot.
Thanks!
DeleteOK, it's a 24V, 350W (MY1016Z).
A link --
http://tncscooters.com/index.php?route=product/product&keyword=MY1016Z&category_id=0&product_id=55
The batteries are a couple of 12V, 7amp-hour sealed lead acid, in series.
If you start a blog or a webpage, let me know.
Thanks for the info! I'll post a link if I ever get around to building out my bike.
Delete